Getting Started with TestBeats
Welcome to TestBeats! This tutorial will guide you through publishing your first test report and setting up team notifications. By the end, you'll have a complete understanding of TestBeats' core workflow.
What You'll Achieve
By completing this tutorial, you will:
- ✅ Install and verify TestBeats on your system
- ✅ Publish test results to TestBeats Portal for analysis
- ✅ Set up team notifications in Slack, Teams, or Google Chat
- ✅ Understand how to view and analyze test results
- ✅ Know your next steps for integrating with real projects
Prerequisites
Before starting, ensure you have:
- A TestBeats account (sign up free)
- A Slack, Teams, or Google Chat webhook URL (optional for Step 4)
- Terminal/command line access
Step 1: Install and Verify TestBeats
Let's start by installing TestBeats and verifying it works on your system.
Option A: With Node.js (Recommended)
If you have Node.js installed:
npx testbeats@latest --versionOption B: Direct Executable
Don't have Node.js? Download the executable:
# Download TestBeats executable
curl https://raw.githubusercontent.com/test-results-reporter/testbeats/main/scripts/download-latest.sh | bash

# Verify installation (for Linux)
./testbeats-linux --version

# Verify installation (for macOS)
./testbeats-macos --version

# Verify installation (for Windows)
./testbeats-win.exe --version✅ Success Check: You should see a version line printed for the TestBeats CLI (the exact version depends on the release you installed).
What You Just Did
You installed TestBeats CLI tool, which will process your test results and publish them to the TestBeats Portal and your team channels.
Step 2: Create Sample Test Results
Now let's create sample test data to work with. This simulates real test results from your testing framework.
Create a file called results.xml with this content:
<?xml version="1.0" encoding="UTF-8"?>
<testsuites name="" tests="2" failures="1" errors="0" time="45.123">
  <testsuite name="Login Tests" tests="2" failures="1" errors="0" time="30.456">
    <testcase name="User should be able to login with valid credentials" classname="com.example.LoginTest" time="15.123"/>
    <testcase name="User should not be able to login with invalid credentials" classname="com.example.LoginTest" time="15.333">
      <failure message="Expected login to fail but it succeeded">
        AssertionError: Login should have failed with invalid credentials
        at LoginTest.testInvalidLogin(LoginTest.java:25)
      </failure>
    </testcase>
  </testsuite>
</testsuites>✅ Success Check: Verify the file exists: ls -la results.xml
What You Just Did
You created a JUnit XML file with sample test results showing 2 tests: 1 passed, 1 failed. This format is supported by most testing frameworks.
Step 3: Publish to TestBeats Portal
Now let's publish your test results to TestBeats Portal where you can analyze them.
Get Your API Key
- Go to TestBeats Portal
- Sign in to your account
- Navigate to Settings → API Keys
- Copy your API key
Publish Your Results
Run the publish command (replace <YOUR_API_KEY> with your actual API key):
# Using npx (if you have Node.js)
npx testbeats@latest publish \
  --api-key <YOUR_API_KEY> \
  --junit results.xml

# OR using direct executable
./testbeats publish \
  --api-key <YOUR_API_KEY> \
--junit results.xml✅ Success Check: You should see this output:
🥁 TestBeats v2.7.x
🧙 Processing results...
🚀 Publishing results to TestBeats Portal...
⚠️ No targets defined, skipping sending results to targets
✅ Results published successfully!(Example output; the banner version matches whatever release you installed, e.g. current npm testbeats.)
Explore Your Results
- Click the provided URL or go to TestBeats Portal
- Find your test run in the dashboard
- Click on it to explore the detailed results
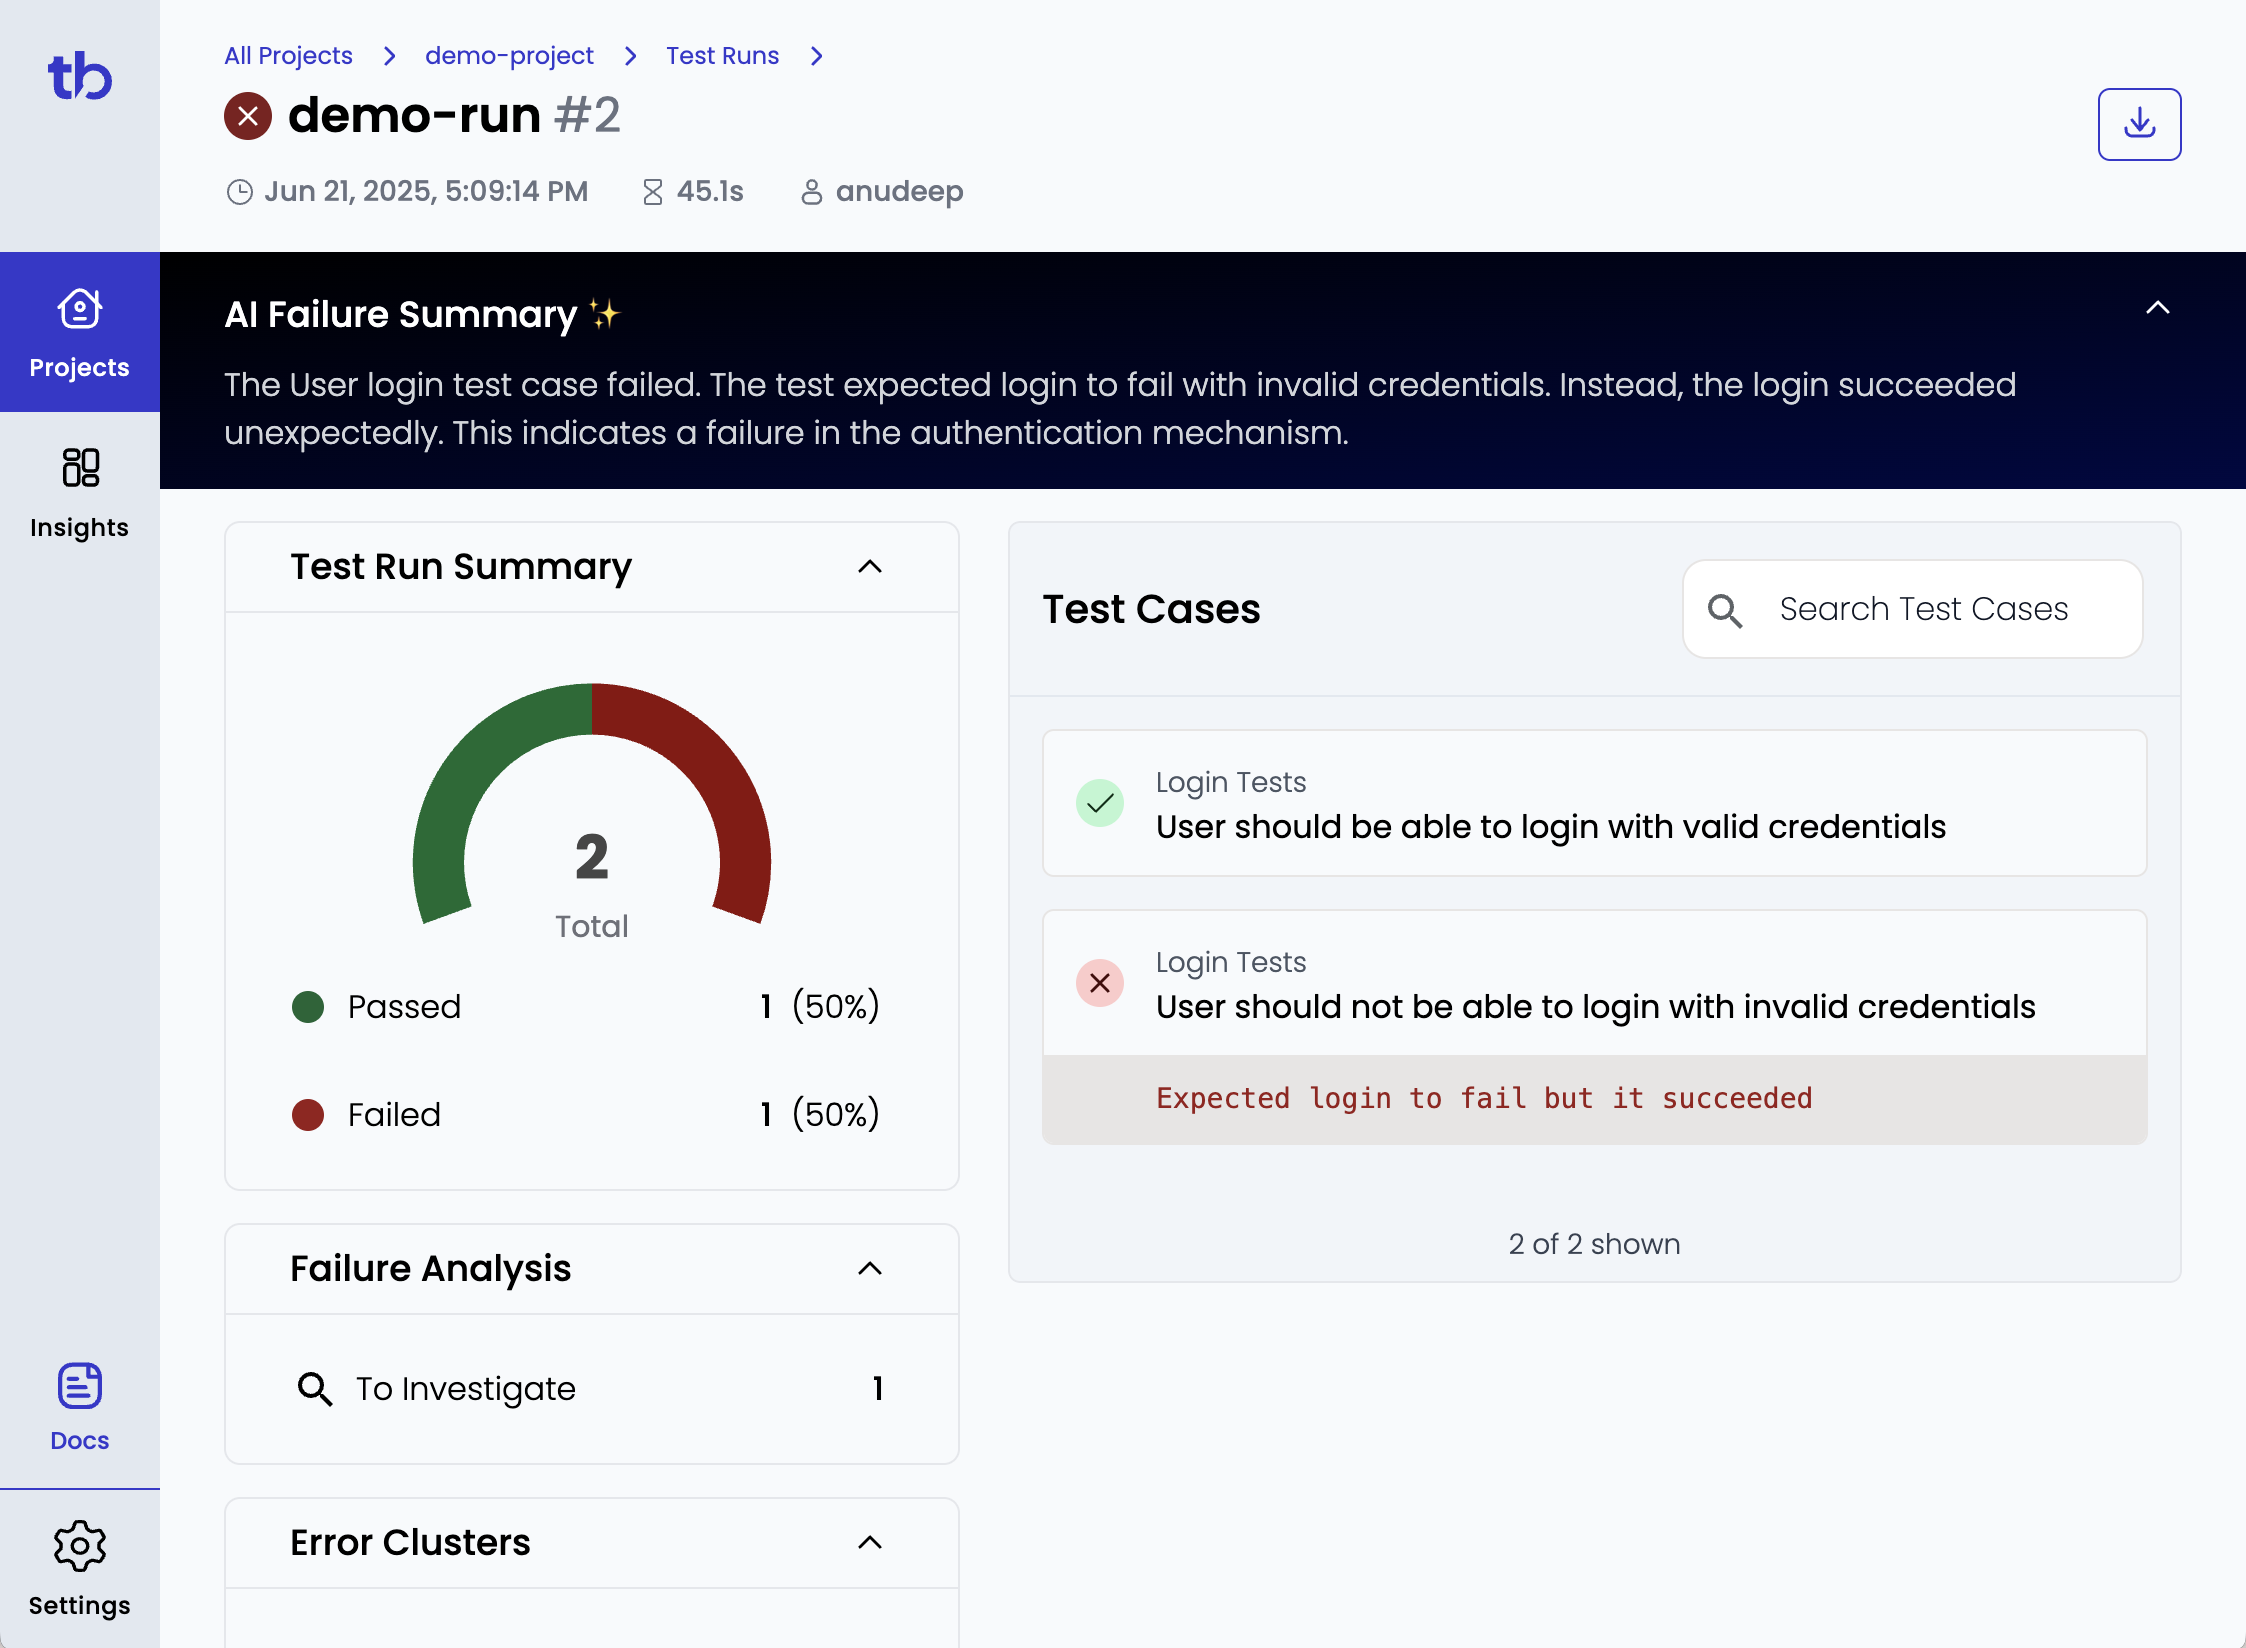
✅ Success Check: You can see:
- Test summary with pass/fail counts
- Individual test case details
- Failure and error messages
- Execution timeline
What You Just Did
You published test results to TestBeats Portal, which processed them and created a detailed report. The Portal provides advanced analysis, AI-powered insights, and historical tracking.
Step 4: Set Up Team Notifications
Let's notify your team about test results through Slack, Teams, or Google Chat.
Get Your Webhook URL
Choose your platform and get the webhook URL:
- Slack: Create Slack Webhook
- Teams: Create Teams Webhook
- Google Chat: Create Chat Webhook
Publish with Notifications
Run the command with your webhook URL:
For Slack:
npx testbeats@latest publish \
  --api-key <YOUR_API_KEY> \
  --slack <YOUR_SLACK_WEBHOOK_URL> \
--junit results.xmlFor Teams:
npx testbeats@latest publish \
  --api-key <YOUR_API_KEY> \
  --teams <YOUR_TEAMS_WEBHOOK_URL> \
--junit results.xmlFor Google Chat:
npx testbeats@latest publish \
  --api-key <YOUR_API_KEY> \
  --chat <YOUR_CHAT_WEBHOOK_URL> \
--junit results.xmlVerify Team Notification
Check your Slack/Teams/Chat channel for the test summary:
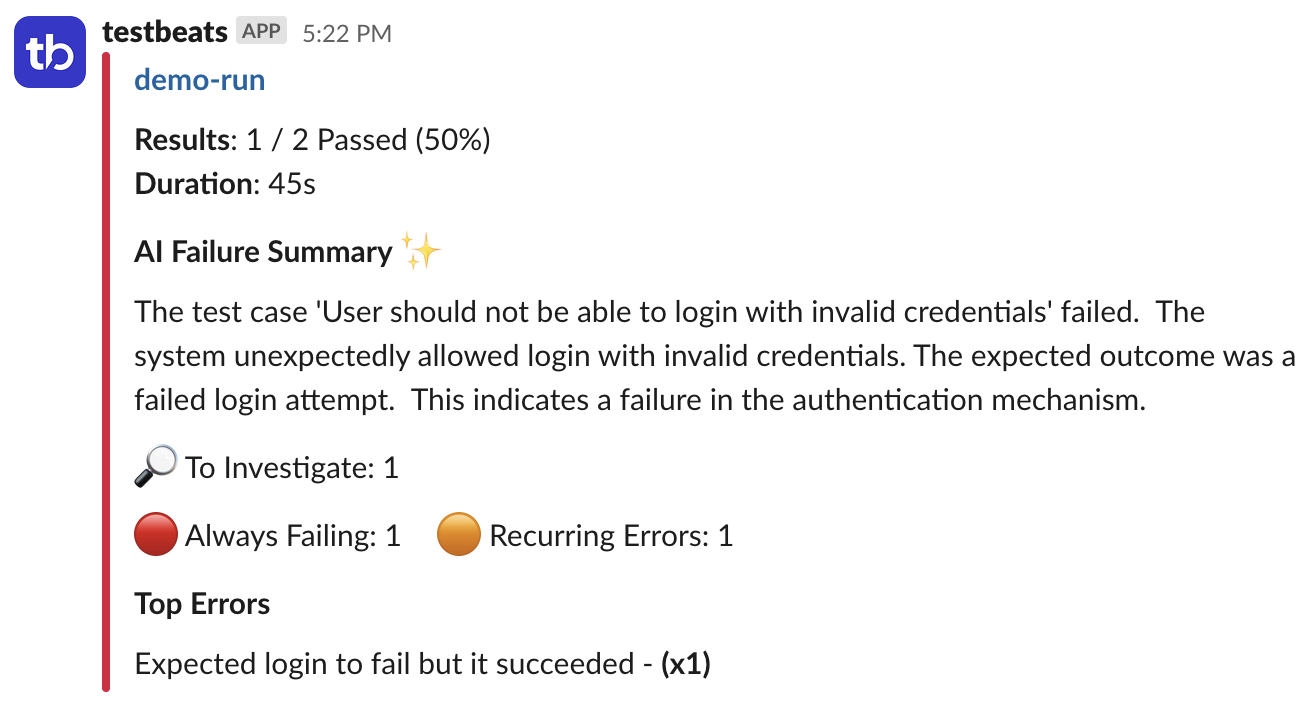
✅ Success Check: Your team channel shows:
- Test run summary with pass/fail counts
- Failed test details with error messages
- Link to detailed results in TestBeats Portal
What You Just Did
You set up automated team notifications that will alert your team whenever tests run. Team members can quickly see results and click through for detailed analysis.
🎉 Congratulations!
You've successfully completed the TestBeats tutorial! You now know how to:
- ✅ Install and use TestBeats CLI
- ✅ Publish test results to TestBeats Portal
- ✅ Set up team notifications
- ✅ View and analyze test results
Next Steps
Now that you understand the basics, here's how to integrate TestBeats with your real projects:
Manage Manual Test Cases
Looking to manage manual test cases alongside your automated tests? TestBeats now supports version-controlled test case management using Gherkin feature files:
- Write test cases in Gherkin and store them in Git
- Review test cases like code through pull requests
- Auto-sync to portal when merged via CI/CD
Learn more in our Manual Test Management Guide.
Get Help
- Documentation: Reference guides
- Community: GitHub Discussions
- Support: [email protected]
Ready for the next step? Choose a framework integration guide above that matches your project! 🚀